Showing posts with label Distress Ink. Show all posts
Wednesday, March 2, 2016
Kraft Plus | March Challenge
I am playing along again at Kraft Plus and once again the challenge is a ripper!
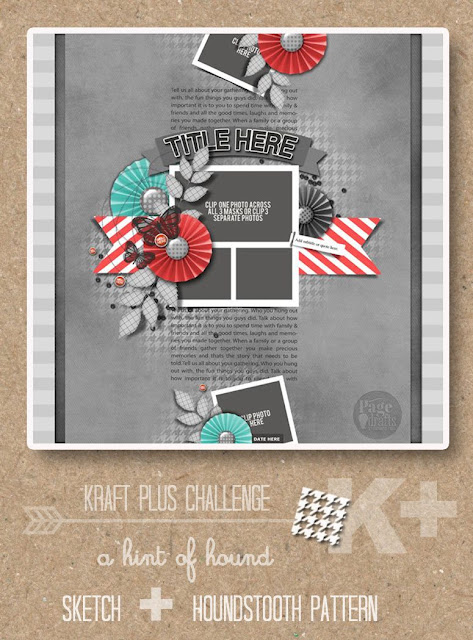
The challenge is to use this sketch and add some houndstooth, all on a Kraft base of course.
I pulled out an older collection from Basic Grey called "Knee-highs & Bow-ties" to scrap this layout that celebrates the wonderful imagination that my youngest son possesses.
I used my Silhouette Cameo, a cut-file from the Silhouette Online Store and some stencil material to create a houndstooth patterned stencil. I applied Gathered Twigs Distress Ink through the stencil with an ink blending tool to give my Kraft background some subtle tone-on-tone texture.
I just love how the Kraft Plus challenges always get me to try new things- now I know how easy it is to make my own stencils with my Silhouette :-)
Monday, February 1, 2016
Kraft Plus | February Guest Designer
I am thrilled to be the Kraft Plus Guest Designer for February. As usual, the challenge really pushed me out of my comfort zone, and that's what I love about challenges.
I created some postage stamp backgrounds with my Silhouette Cameo and utilized some old papers from Stampin' Up that had a postage stamp theme. I aged everything with Distress Inks including the wood veneer letters from Studio Calico.
I hope you'll play along with the challenge!
Wednesday, October 14, 2015
CAS-ual Fridays | CFC144
I decided to play along with CAS-ual Friday's TicTacToe Challenge this month, and I made a card featuring stencilling, die-cutting and embossing.
I started with some watercolour paper and a Stampin' Up star stencil. I applied Versamark Ink through the stencil and then white heat embossed the stars. I then watercoloured the background with Distress Inks in Peacock Feathers, Cracked Pistachio and Fossilized Amber.
I die-cut some balloons from plain white cardstock with dies from MFT and then coloured those with the same Distress Inks using a foam ink blending tool.
I took a sentiment from Avery Elle and white heat embossed it on some vellum before trimming it to a banner shape.
Some silver thread for the balloon tails were the final finishing touch.
Thanks for dropping by!
Sunday, October 11, 2015
Just Add Ink | #283
I'm playing along with Just Add Ink again as I needed a birthday card and I spotted their sketch to inspire me.
I started with some Tim Holtz Watercolour Paper and a Heidi Swapp stencil through which I applied some Texture Paste in a random fashion. Once that had dried I used various pink and mauve shades of Distress Inks to watercolour around the dried paste.
I then took a piece of white cardstock and gold heat embossed a background stamp from Hero Arts and cut it to a banner shape.
Using the same Distress Inks I used on the background, I stamped and diecut images from Stampin' Up's Flower Patch set. After applying the ink, I spritzed the stamps a couple of times with water to create a looser look to my stamping.
I gold heat embossed a sentiment from the Flower Patch set and cut it into another banner shape.
A loose nest of gold thread and some gold sequins were the final finishing touches.
This was a fun card to make as it's not my usual clean and simple style, but I know the recipient will love it :-)
Tuesday, October 6, 2015
Feeling Sketchy | World Cardmaking Day Challenge
The Feeling Sketchy Team are running a special challenge to celebrate World Cardmaking Day and here is the inspiration photo.....
Although it's not Autumn here in Australia, I decided to play along with these gorgeous colours and make a birthday card.
I added Distress Inks in Bundled Sage, Wild Honey and Spiced Marmalade to some watercolour paper, then diecut a tag from the panel. I then diecut another four tags from white cardstock to add dimension before popping it all back into the negative space. I painted and clear embossed a chipboard "happy" from 2Crafty and white heat embossed a sentiment from Avery Elle on a strip of black cardstock.
I added some black and white twine to the tag to co-ordinate with the sentiment strip.
Thanks for stopping by- all the challenge details can be found on the Feeling Sketchy blog.
Sunday, August 16, 2015
Feeling Sketchy | Sketch #127
We have a new sketch to play with at the Feeling Sketchy Challenge Blog and our challenge sponsor is Bugaboo Digi Stamps.
Here is the sketch we are playing with.....
I used this Bugaboo image, coloured it with Copics and fussy-cut it out. I changed out the squares in the sketch for triangles and flipped it so my focal point was on the left hand side of my landscape-oriented card.
My background was created by blending Distress inks and by die-cutting a triangle pattern from white cardstock with my Silhouette machine. Rather than attempt to get some dimension by using foam tape, I cut the panel three times and adhered them to each other for the dimension I was after.
I used my Distress Inks again on the banner and tried to mimic the same blend as the background panel.
Some Clear Wink of Stella was added here and there, and sequins were the final finishing touch.
Be sure to head over to the Feeling Sketchy Blog for more inspiration and all the challenge details.
Saturday, June 27, 2015
CAS-ology | Nautical Challenge
I mentioned in my previous post that I was playing along with some card challenges to get the creative juices flowing and here is a card inspired by the Nautical theme over at the CAS-ology Blog.
I decided to do some watercolouring with Distress Inks to create a softer colour palette than I usually use. I also stamped in Versafine Sepia Ink instead of my usual black, and I heat embossed it with clear embossing powder. The stamps were from Stampin' Up, the wood veneer anchor from Studio Calico and the tag die from Sizzix/Tim Holtz.
Thanks for stopping by!
Friday, June 5, 2015
Scrappy Canary | April "Mayfair" Scrapbook Kit Layout
I'm back with another 8.5"x11" layout using the April "Mayfair" Kit. I started by adding a little bit of a Distress Ink wash in small areas on my background and then built my page vertically down the right hand side.
I cut apart one of the pattern papers to create my little banner strips- I love to cut papers apart to make embellishments. I added some chipboard pieces from the Echo Park set in the kit and stitched those down with my sewing machine.
I added a scattering of the puffy stickers here and there too....I love the variety of colours in the pack.
Don't forget to check out all the new goodies in the Scrappy Canary Store and to use the code LOUISE10 for 10% off your purchase :-)
Tuesday, June 2, 2015
Feeling Sketchy | Sketch #122
We have a new sketch to play with at the Feeling Sketchy Challenge Blog and our challenge sponsor is Creative Embellishments.
Creative Embellishments is a small, family owned company located in western New York that was started by a dynamic husband and wife team. Michael Kramer is a prolific graphic artist who creates websites, mobile websites, logos and images for print design. Nicolle is a stay at home mother of 4 and a passionate artist who has been actively creating for over 8 years. She enjoys altered art, mixed media applications and all styles of scrapbooking. What started out as a hobby, in order to pass down memories and family history to her children, evolved once she discovered the vast online community of artists and scrappers 3 years ago. She has been featured on numerous scrapbooking, challenge and top paper manufacturing websites; as well as, serving on many different design teams. She's also had the honor of having her work published in print magazines and a well-known sketchbook.
Here's Sketch #122.....
I decided to make a background on watercolour paper using a wash of Peacock Feathers Distress Ink. While that dried I stamped the wreath from this stamp set with Ranger Black Archival Ink and die-cut it with the co-ordinating die. I cut an additional two wreaths from white cardstock and layered them all together for extra dimension and durability.
I then applied a very loose wash of Picked Raspberry Distress Ink to the wreath.
I stamped my sentiment from this Prima stamp set in Ranger Archival Jet Black Ink.
The finishing touch was some pink ribbon. I did make this card just before Mother's Day, but this design would translate well to other occasions by simply stamping a different sentiment.
Be sure to head over to the Feeling Sketchy Blog for more inspiration and all the challenge details.
Subscribe to:
Posts (Atom)