

Monday, November 26, 2012
Project Life Week 47
Hubs is home from China so the week included lots of father-son type activities including a camp-out in the backyard. I used up some old SEI scrapbooking papers and some freebie journalling cards I found via Pinterest. I printed some of the photos at 1.5" x 3" as well as my usual 3" x 4" and 6" x 4" just to fit more photos in and still have room for some "white space". Visually it looks better to have some "white space" and I try to do this in my regular scrapbooking and cardmaking as well.

Sunday, November 25, 2012
Just Add Ink #145
The challenge this week at Just Add Ink is a sketch challenge.

I made this card for Holiday Card Workshop Day 9 featuring Sentiment Stamps and it's layout was inspired by this JAI sketch.


I made this card for Holiday Card Workshop Day 9 featuring Sentiment Stamps and it's layout was inspired by this JAI sketch.

Kristina used similar colours and the same sentiment and "faux metal" embossing technique in the class and I was keen to give it a go. I took a piece of scrap cardstock and applied four layers of silver embossing powder. Then I inked up my sentiment (from Technique Tuesday) with Stazon before applying a fifth layer of powder As soon as it had melted, I stamped the sentiment being sure to push it into the melted embossing powder. The addition of black ink to the stamp ensured the sentiment was easier to read than if it had been applied without ink. I then trimmed it down to size, rounded the corners and popped it on top of some glittery washi tape strips. This was a fun technique but I need more practice to get a really neat and finished end result.
Saturday, November 24, 2012
Holiday Card Workshop Day 8
Day 8 at Holiday Card Workshop was all about Cards Using Dies. I have the Ornament Keepsakes stamp and die set from Stampin' Up which I just love for Christmas cards. For the card on the right, I heat embossed some silver glitter onto some white cardstock before die cutting it, and for the card on the left, I stamped directly onto the cardstock and just diecut a little stamped and embossed circle for interest on the middle ornament. Some rhinestones on both cards added a necessary touch of bling.

I love stamp+die combination sets and it's great to see so many manufacturers offering these now. Some of my favourites are from Stampin' Up , Hero Arts and Papertrey Ink.

I love stamp+die combination sets and it's great to see so many manufacturers offering these now. Some of my favourites are from Stampin' Up , Hero Arts and Papertrey Ink.
Friday, November 23, 2012
Holiday Card Workshop Day 7
You've probably realised that this class is over now, but I haven't been keeping up with sharing my homework.....naughty me.....but here is Day 7's card and this class focussed on Reverse Stamps. I bought this stamp from Hero Arts/Basic Grey when I did the "Stretch Your Stamps" class and I'll admit I haven't used it since. So, for this card I stamped the reverse stamp in black stazon on white cardstock and then coloured in the negative parts with markers. I then stamped a greeting from this Hero Arts clear stamp set on vellum with Versamark and then heat embossed with a bright green Zing embossing powder from American Crafts. I wrapped the vellum round the stamped background piece and adhered it to the back before attaching the whole panel to a white card base. If I was having a "do-over", I would also slip a little bit of adhesive behind the embossed sentiment just so that the vellum piece sits a bit flatter.

I still don't particularly like reverse stamps- not sure why-, but I can think of a few different ways to use them in future projects.

I still don't particularly like reverse stamps- not sure why-, but I can think of a few different ways to use them in future projects.
Monday, November 19, 2012
Project Life Week 46
Week 46 went a little something like this......caused some damage to my car, changed the wheel by myself (with Hubs talking me through it via Skype), Craft Group, Play Group, Swimming Lesson, School Assembly, Stagecoach, Hubs home from China, catching up on chores, filling Made at Number 27 store orders, catching up with friends.......:-)


Sunday, November 18, 2012
JAI #144- Just Add Music & CFC79- Winter Blues
I was inspired by a card on page 9 of the Stampin' Up! Holiday Catalogue that used light blue, dark red and white. I decided on the colour combo of Bashful Blue, Midnight Muse and Cherry Cobbler to create this Christmas card using the Stampin' Up! Welcome Christmas stamp set and a musical background cling stamp from Hero Arts.

The music image was stamped in versamark and clear embossed on the Bashful Blue card base, while the cherry cobbler cardstock piece was embossed with a music Cuttlebug embossing folder.
After I made this card for the "Just Add Music" challenge at Just Add Ink, I noticed that the theme this week at CAS-ual Fridays is "Winter Blues", and was pleased that this card meets the brief for that challenge as well ;-)
The little ones and I have spent the weekend getting used to Daddy's presence in the house again, and also getting used to the moustache he is growing for Movember. If you would like to donate to this worthy cause for men, or simply find out more about Movember, you can visit his "Mo-space" HERE.
Tuesday, November 13, 2012
Just Add Ink #143
This week at Just Add Ink it's a colour challenge.

Now when I first saw these colours together I thought "Ummmmm oookaaaayy" and had absolutely no idea how to balance them and create a card in a style I'm comfortable with. Then I thought "Hang on- isn't the whole point of these challenges to get me OUT of my comfort zone?" Anyway, once I started to flip through my stamp sets and think about who I could make a card for, I quickly decided to do a masculine Birthday card.


Now when I first saw these colours together I thought "Ummmmm oookaaaayy" and had absolutely no idea how to balance them and create a card in a style I'm comfortable with. Then I thought "Hang on- isn't the whole point of these challenges to get me OUT of my comfort zone?" Anyway, once I started to flip through my stamp sets and think about who I could make a card for, I quickly decided to do a masculine Birthday card.

I'm still not sure about the finished card- I think if I was to get a do-over, I would use the same design but use the colours differently, and also replace the orange and white baker's twine with a button in that space next to the sentiment.
Project Life Week 45
It was another pretty routine week at Number 27 with our normal scheduled activities and a lovely picnic/playdate with friends on Sunday. What I love about Project Life is that even after a very routine week there are still plenty of photos and stories to be told- stories that represent who we are at this moment in time.


Saturday, November 10, 2012
Crazy Love
Scrapbooking is my first papercraft love but I constantly battle to find the time for it. I like to start and finish a project in one sitting so finding a chunk of time that big is well, you know......LOL! This is probably why I make so many cards ;-)
I love this photo of my boys in the bath. Although they were born four years apart, they just love playing together and making mischief. Bathtime is always crazy-time with lot of splashing and giggles.
One of my best tricks for scrapping quickly is to use a sketch or to scrap-lift from a layout I love- either one of my own or a layout by one of the many talented scrappers out there. I was inspired by this layout by allieH in the Studio Calico gallery. Her layout featured three small photos but I thought I could adapt aspects of it for my single photo. I had leftovers from a Studio Calico kit that I knew would work and by the time I added machine stitching, some stamping and some ink splats my layout became a bit busier than the inspiration layout, but you can see the basic structure is the same. After pulling out the supplies and getting organised, this layout came together in about half an hour.

My husband works overseas for about 6 weeks at a time, but when he's home I can usually convince him to take the boys on a long outing so I can carve out some scrapping time. I always make sure I have a bunch of photos edited and printed and ready to go!
Wednesday, November 7, 2012
Holiday Card Workshop Day 6
Day 6 was all about Cards with Inking Techniques and some really clever ideas were showcased. I decided to take a Christmas image, heat emboss it with black powder and then colour my background with four shades of Distress Inks. I then flicked pearlised water on the background to create "snow". It's difficult to see the lovely shine in the photo but it's lovely and subtle in real life. I stamped/embossed my sentiment directly onto the background but too much of the embossing powder stuck to the distress inks, so I covered up my boo-boo with another piece, stamped and embossed BEFORE colouring with inks ;-)


Before today's class I thought I had seen just about every inking technique, but I learned a few new tips and tricks. I wish there were more hours in the day to try them all.....and I wish I had all the great supplies the girls used!
Tuesday, November 6, 2012
Neon Christmas
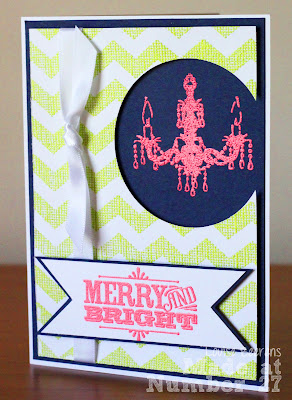
I was recently asked to make some Christmas cards for a customer and the brief was to use neon green, neon pink and navy blue, plus to inject a little bit of humour into the design. They also had to be on-trend since the recipients are in the design field. I came up with two designs- one using neon embossing powders, and the other neon cardstocks.
This first card features a trendy chevron background embossed in neon green with a chandelier embossed in pink.
This second card features handcut neon cardstock reindeer and a quirky sentiment. If my new Cameo had arrived I would have used that to cut them out!

Despite being a little bit overwhelmed initially, I really enjoyed using neon for these. One of the Bonus Classes in the Holiday Card workshop was about non-traditional colours for Christmas cards and I think neon might fit in that category!
This first card features a trendy chevron background embossed in neon green with a chandelier embossed in pink.

This second card features handcut neon cardstock reindeer and a quirky sentiment. If my new Cameo had arrived I would have used that to cut them out!

Despite being a little bit overwhelmed initially, I really enjoyed using neon for these. One of the Bonus Classes in the Holiday Card workshop was about non-traditional colours for Christmas cards and I think neon might fit in that category!
Project Life Week 44
Another pretty routine week here at Number 27. This week I used some old patterned papers from American Crafts and stuck to my regular format.


I'm starting to think about how to approach Project Life in 2013. I considered going digital, but I think I'll stick with paper/hybrid. I usually use papers etc from my stash but with so many manufacturers bringing out lines specifically for Project Lifers I may decide to purchase one of those great lines and use it throughout the album. Still some time to decide.......
Monday, November 5, 2012
Holiday Card Workshop Days 4 & 5
Day 4 was all about cards featuring Outline Stamps. There were some great colouring techniques demonstrated including colouring with Distress Inks and Copic markers. I decided to colour my black-embossed ornaments with distress inks. I just simply "smooched" my inkpads onto an acrylic block and then picked up the colour with my waterbrush.


Day 5 of class was about cards using Stamp+Die Combos. I used an ornament stamp+die set from Stampin' Up and kept this card very clean and simple. Old Olive and Cherry Cobbler are classic Christmas colours and I combined them with Very Vanilla and Crumb Cake since I already had those out from the previous card.

I am quite addicted to stamp+die combo sets - it just makes my cards so much neater and more polished looking. I prefer to stamp first and cut second- it's easy to position the die around the stamped image and hold it in place with some washi tape.
Sunday, November 4, 2012
CFC 77
The challenge this week at CAS-ual Fridays is to create a Clean & Simple Masculine Card. I decided to create a birthday card using black/white/orange and to make a bold background using Avery Elle stamps.


We are having some dreadfully wet weather here at the moment and it is very difficult to get good photographs even right by the window. Oh well, we do need the rain and it won't be long before we're complaining that it's too hot!
Saturday, November 3, 2012
Holiday Card Workshop Days 2 & 3
Day 2 of Holiday Card Workshop was all about background stamps. I loved Jennifer's card that featured nested die-cuts and I was also inspired by her colour scheme. I diecut the ornament first, both from my kraft panel and the pool cardstock, then nested the pool diecut in the negative space in the kraft. Then I stamped my Lattice background stamp in Versamark Ink and embossed with white embossing powder. I adhered the pool piece to the inside of the card so when the card is closed, it sits inside the kraft piece. A few other bits and pieces finished the card off.


Day 3 of Class was all about cards with dry embossing. I loved Kristina's card where she made her own score lines to form a plaid pattern and then highlighted the pattern with distress inks. I decided to use an embossing folder instead and then coloured my white cardstock with Festive Berries Distress Ink. I white embossed the sentiment on white cardstock before applying the same ink. I was also inspired by Kristina's card layout but I moved things around a little bit.

This afternoon we collected Master 6's new spectacles. He (thankfully) chose a really trendy pair and here's a photo I took the day of his eye examination earlier this week, just after he'd made his final decision to get this pair.

I hope you are all having a great weekend. I'll be back to share some more cards from Holiday Card Class just as soon as I get caught up!
Friday, November 2, 2012
Project Life Weeks 42 & 43
Week 42 was a pretty routine week with nothing special going on. Strangely enough, those are the weeks I love the most ;-)

Week 43 was quite warm so we got outdoors with walks to the park and a trip to the Water Playground.

I love that Project Life captures these everyday moments that wouldn't normally feature in a regular scrapbooking layout. Master 6 actually prefers looking through PL pages over scrapbooking albums!
Just Add Ink #142
It's time for a sketch challenge at Just Add Ink this week. As soon as I saw the sketch I knew I wanted to use patterned papers and a stamped border.

I didn't use any embellishments in the top right corner, but decided instead to machine stitch around the stamped panel and the patterned paper mat. The little boy stamp and patterned papers are from Stampin' Up and the stamped zig-zag border is from Neat and Tangled. Apologies for the photo quality- it was a pretty dull day today!

I didn't use any embellishments in the top right corner, but decided instead to machine stitch around the stamped panel and the patterned paper mat. The little boy stamp and patterned papers are from Stampin' Up and the stamped zig-zag border is from Neat and Tangled. Apologies for the photo quality- it was a pretty dull day today!

Subscribe to:
Posts (Atom)